Thuộc tính image-rendering được dùng để thiết lập thuật toán масштабирование ảnh. Thuộc tính này thay đổi hành vi масштабирование khi ảnh lớn hoặc nhỏ hơn kích thước gốc.
Cú pháp:
shape-rendering: auto | crisp-edges | pixelated | initial | inherit
Giá trị thuộc tính:
- auto: Thuật toán масштабирование sẽ phụ thuộc vào trình duyệt. Các trình duyệt khác nhau có thể dùng các thuật toán khác nhau.
- crisp-edges: Thuật toán sẽ giữ độ tương phản và cạnh ảnh. Nó sẽ không làm mịn màu sắc hay làm mờ ảnh. Một số thuật toán được dùng là nearest-neighbor và non-smoothing.
- initial: Đặt thuộc tính về giá trị mặc định của nó.
- pixelated: Thuật toán nearest-neighbor được dùng khi phóng to ảnh. Khi thu nhỏ ảnh, hành vi tương tự như giá trị auto.
- inherit: Thuộc tính sẽ kế thừa từ phần tử cha của nó.
Ví dụ: Trong ví dụ này, chúng ta dùng thuộc tính image-rendering: auto.
HTML<!DOCTYPE html>
<html>
<head>
<title>
CSS | image-rendering
</title>
<style>
.image-crisp {
/* Using the crisp-edges
value for demonstration */
image-rendering: crisp-edges;
}
.image-auto {
image-rendering: auto;
}
</style>
</head>
<body>
<h1 style="color: green">
GeeksforGeeks
</h1>
<b>
CSS | image-rendering
</b>
<p>
Comparing the 'crisp-edges'
value with the 'auto' value
in Firefox
</p>
<div class="container">
<img class="image-crisp"
src=
"https://media.geeksforgeeks.org/wp-content/uploads/20191202010422/eg-image.png"
width="250px">
<img class="image-auto"
src=
"https://media.geeksforgeeks.org/wp-content/uploads/20191202010422/eg-image.png"
width="250px">
</div>
</body>
</html>
Kết quả: So sánh giá trị crisp-edges với giá trị auto.

Ví dụ: Trong ví dụ này, chúng ta dùng thuộc tính image-rendering: crisp-edge.
HTML<!DOCTYPE html>
<html>
<head>
<title>
CSS | image-rendering
</title>
<style>
.image-auto {
image-rendering: auto;
}
.image-crisp {
image-rendering: crisp-edges;
}
</style>
</head>
<body>
<h1 style="color: green">
GeeksforGeeks
</h1>
<b>
CSS | image-rendering
</b>
<p>
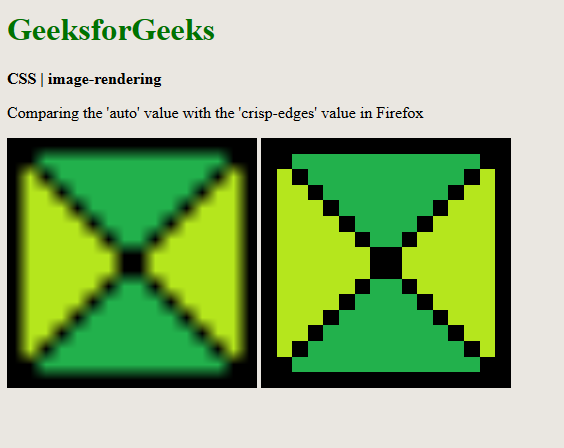
Comparing the 'auto' value
with the 'crisp-edges' value
in Firefox
</p>
<div class="container">
<img class="image-auto"
src=
"https://media.geeksforgeeks.org/wp-content/uploads/20191202010422/eg-image.png"
width="250px">
<img class="image-crisp"
src=
"https://media.geeksforgeeks.org/wp-content/uploads/20191202010422/eg-image.png"
width="250px">
</div>
</body>
</html>
Kết quả: So sánh giá trị auto với giá trị crisp-edges.
Ví dụ: Trong ví dụ này, chúng ta dùng thuộc tính image-rendering: pixelated.
HTML<!DOCTYPE html>
<html>
<head>
<title>
CSS | image-rendering
</title>
<style>
.image-crisp {
/* Using the crisp-edges
value for demonstration */
image-rendering: crisp-edges;
}
.image-pixelated {
image-rendering: pixelated;
}
</style>
</head>
<body>
<h1 style="color: green">
GeeksforGeeks
</h1>
<b>
CSS | image-rendering
</b>
<p>
Comparing the 'crisp-edges'
value with the 'pixelated'
value in Firefox
</p>
<div class="container">
<img class="image-crisp"
src=
"https://media.geeksforgeeks.org/wp-content/uploads/20191202010422/eg-image.png"
width="250px">
<img class="image-pixelated"
src=
"https://media.geeksforgeeks.org/wp-content/uploads/20191202010422/eg-image.png"
width="250px">
</div>
</body>
</html>
Kết quả: So sánh giá trị crisp-edges với giá trị pixelated.

Ví dụ: Trong ví dụ này, chúng ta dùng thuộc tính image-rendering: initial.
HTML<!DOCTYPE html>
<html>
<head>
<title>
CSS | image-rendering
</title>
<style>
.image-crisp {
/* Using the crisp-edges
value for demonstration */
image-rendering: crisp-edges;
}
.image-auto {
image-rendering: initial;
}
</style>
</head>
<body>
<h1 style="color: green">
GeeksforGeeks
</h1>
<b>
CSS | image-rendering
</b>
<p>
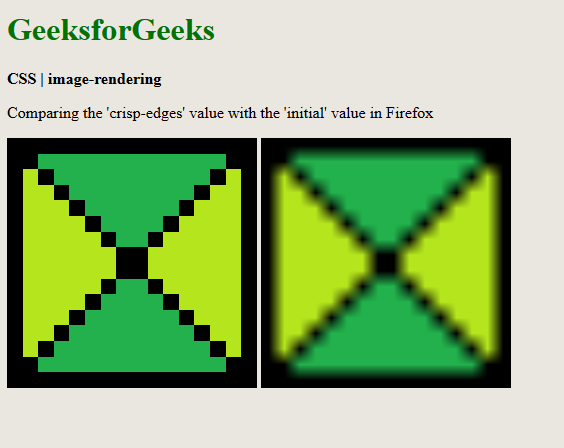
Comparing the 'crisp-edges'
value with the 'initial'
value in Firefox
</p>
<div class="container">
<img class="image-crisp"
src=
"https://media.geeksforgeeks.org/wp-content/uploads/20191202010422/eg-image.png"
width="250px">
<img class="image-auto"
src=
"https://media.geeksforgeeks.org/wp-content/uploads/20191202010422/eg-image.png"
width="250px">
</div>
</body>
</html>
Kết quả: So sánh giá trị crisp-edges với giá trị initial.
Trình duyệt hỗ trợ: Các trình duyệt hỗ trợ thuộc tính image-rendering được liệt kê dưới đây:
- Chrome 13+
- Edge 79+
- Firefox 3.6+
- Safari 6+
- Opera 15+